
Getting started with Microsoft Cognitive Services Face API
As the world gets increasingly more data power, we are enabled to do more things (in the lack of better words). One of those things is to make computers and applications more intelligent, and Microsoft have created a series of API’s to help doing so. Using Microsoft Cognitive Services you’re able to do use a whole bunch of API’s, ranging from translation, searching, language-based and facial recognition. I find a lot of them interesting, especially the Face API, which I’ll spend some time taking a closer look at.
This post is the first post, in a series of posts, where the ultimate goal is to achieve enough knowledge of the Face API to use it for a IoT smart home project. In this post I will cover some basic glossary, with terms that may be defined in other ways than we’re used to. I’ll touch on how to sign up for a free preview of the API, the basics of our app and at last I’ll show you how to identify faces in images.
A quick note on the language selection. Throughout this series all my examples will be coded in C#, as there is a nice client library for C#. However, the services are simply a cloud API, which can be invoked through HTTPS request, which in turn returns a response in JSON. There you’re able to use any language you’d like; however, I won’t be going into details on the deeper level API calls required.
##Face API Glossary
Before I can show you the Face API there are several terms which requires additional description, for the rest of this post to make any sense. The following list describes those words:
__Attributes__
Attributes is values which can be a part of the detection result. Attributes gives extra information on faces, such as age, gender, head pose, facial hair and smiling.__Face__
Face is a term used to describe the detected face derived from the Face API. At the very basic a face consists of a unified identity (Face ID), as well as a defined region in an image (Face Rectangle). A face can also contain attributes.__Groups__
A group contains a collection of similar faces, identified by their Face ID. Groups is derived from Face Grouping, which is a collection of faces according to facial similarity. Faces that is not similar to others is placed in a group called messy group.__Identification__
Identification is the process of identifying one or more faces in a person group. If there is more faces in a request all will be identified separately.__Person__
Person is a data structure containing an ID, a name, a collection of Face IDs and user data.__Person Group__
A person group is a collection of persons, and a unit of identification. It contains an ID, a name and user data.__Status__
Status is a string describing the procedure of train.__Train__
Train is the process needed to facilitate identification. You train a specific person group.__Verification__
Verification is the process used to determine if two faces are the same or not.
For a more extensive glossary you should visit Microsoft’s documentation.
##The basics of our cognitive app The end goal of this series is to have an app that is able to utilize a web camera to get an image of a person, identify the person and show the name of the person on screen. In the end this will be deployed to a Raspberry Pi, however this is not required to follow along this series.
We need to create an app, capable of running on an IoT device. This app should be able to process a stream from a web camera and grab an image of a person. This should be identified using the Face API, and the name should be given back. Throughout the code I have tried to keep the focus on the usage of the Face API, and as such everything may not be best practice.
All the code for this post can be found at GitHub.
##Getting API keys The first thing you want to do is to sign up for the service, which you can do over at Microsoft’s site. It should be a free subscription there, and the steps you need to do is explained in the link. Once you’ve signed up, you can request trials for the different API’s included, and you’ll want to select “Face”.
When this is done, you should take a note of the subscription keys, as shown in the image below. 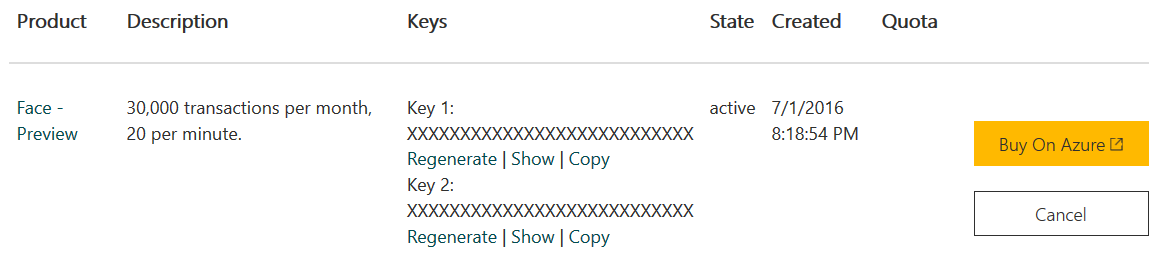
You can also purchase the same subscription on Azure, by clicking the button to the right. I guess that ultimately Microsoft wants everybody to move over there, but for now this preview works. As for pricing in Azure, it costs $1,50 per 1,000 transactions, and as you may see this preview allows for 30,000 transactions a month, so the value is great.
##Marking a face For the app you’ll want to create a new UWP app. Two additional NuGet packages is needed; Newtonsoft.JSON and Microsoft.ProjectOxford.Face, so go on to add those to the app. We’ll create everything we need in this example in the MainPage.xaml, and the code-behind file, MainPage.xaml.cs. The UI will be rather simple, just a canvas for our image, two buttons and a status label. Add the following to MainPage.xaml:
<Grid.RowDefinitions>
    <RowDefinition Height="*" />
    <RowDefinition Height="50" />
</Grid.RowDefinitions>
<Grid.ColumnDefinitions>
    <ColumnDefinition Width="120" />
    <ColumnDefinition Width="120" />
    <ColumnDefinition Width="*" />
</Grid.ColumnDefinitions>
<Canvas x_Name="FaceCanvas" Visibility="Visible" Grid.Row="0" Grid.ColumnSpan="3" Grid.Column="0" />

<Button x_Name="BrowseButton" Content="Browse..." Click="BrowseButton_Click" Grid.Row="1" Grid.Column="0" Width="100" HorizontalAlignment="Center" />
<Button x_Name="FindFaceButton" Content="Find face..." Click="FindFaceButton_Click" Grid.Row="1" Grid.Column="1" Width="100" HorizontalAlignment="Center" />
<TextBlock x_Name="StatusField" Text="Status: waiting..." Grid.Row="1" Grid.Column="2" VerticalAlignment="Center" />
The browse button simply finds an image and loads it to the view. Clicking “Find face…” will make a call to the Face API and when the result is returned, put a green square around the face, if there is any.
In the code behind the first thing needed is to add an object for the face service client. Do that like this:
private readonly IFaceServiceClient _faceServiceClient = new FaceServiceClient("YOUR_API_KEY");
Make sure you have added reference and using statement for Microsoft.ProjectOxford.Face and Microsoft.ProjectOxford.Face.Contract.
For the browse button, I have shamelessly copied example code for a file picker from Suresh-m, found here. It looks like this:
private StorageFile _imageFile;

private async void BrowseButton_Click(object sender, RoutedEventArgs e)
{
   // Thanks to Suresh-M at https://code.msdn.microsoft.com/File-Picker-in-Windows-10-846c2116
   // for filepicker code.
   FileOpenPicker openPicker = new FileOpenPicker();
   openPicker.ViewMode = PickerViewMode.Thumbnail;

   openPicker.SuggestedStartLocation = PickerLocationId.PicturesLibrary;

   openPicker.FileTypeFilter.Add(".jpg");
   openPicker.FileTypeFilter.Add(".png");

   _imageFile = await openPicker.PickSingleFileAsync();

   if (_imageFile == null)
   {
      StatusField.Text = "Status: Image failed to load";
      return;
   }

   FaceCanvas.Children.Clear();

   var stream = await _imageFile.OpenAsync(FileAccessMode.Read);
   BitmapDecoder decoder = await BitmapDecoder.CreateAsync(stream);

   BitmapTransform transform = new BitmapTransform();
   const float sourceImageHeightLimit = 1280;

   if (decoder.PixelHeight > sourceImageHeightLimit)
   {
      float scalingFactor = (float)sourceImageHeightLimit / (float)decoder.PixelHeight;
      transform.ScaledWidth = (uint)Math.Floor(decoder.PixelWidth * scalingFactor);
      transform.ScaledHeight = (uint)Math.Floor(decoder.PixelHeight * scalingFactor);
   }

   _bitmapSource = await decoder.GetSoftwareBitmapAsync(decoder.BitmapPixelFormat, BitmapAlphaMode.Premultiplied, transform, ExifOrientationMode.IgnoreExifOrientation, ColorManagementMode.DoNotColorManage);

   ImageBrush brush = new ImageBrush();
   SoftwareBitmapSource bitmapSource = new SoftwareBitmapSource();
   await bitmapSource.SetBitmapAsync(_bitmapSource);
   brush.ImageSource = bitmapSource;
   brush.Stretch = Stretch.Uniform;
   FaceCanvas.Background = brush;

   StatusField.Text = "Status: Image loaded";
}
Now, on to the fun part. We need to make a call to the Face API to send the image to the service, and retrieve a result with a face back, if it exists. The code to do this is like this:
private async void FindFaceButton_Click(object sender, RoutedEventArgs e)
{
FaceRectangle[] faceRects = await UploadAndDetectFaces();
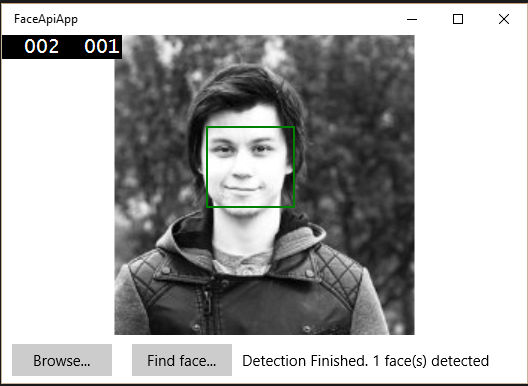
StatusField.Text = $"Detection Finished. {faceRects.Length} face(s) detected";
if (faceRects.Length > 0)
{
MarkFaces(faceRects);
}
}
private async Task<FaceRectangle[]> UploadAndDetectFaces()
{
try
{
StatusField.Text = "Status: Detecting...";
using (Stream imageFileStream = await _imageFile.OpenStreamForReadAsync())
{
var faces = await _faceServiceClient.DetectAsync(imageFileStream);
var faceRects = faces.Select(face => face.FaceRectangle);
return faceRects.ToArray();
}
}
catch (Exception ex)
{
StatusField.Text = $"Status: {ex.Message}";
return new FaceRectangle[0];
}
}
As you may see it is not very complex. It is a method triggered on button click, which calls another method, UploadAndDetectFaces. This method in turn opens a stream for the image, and calls the Face API client, which detects face(s) in the image. This is returned to the click handler, which calls on the next method to draw a green rectangle around the face(s). I won’t bother to post that part of the code, as it is not interesting for what we’re trying to achieve here, other than the fact that we use the result from our detect faces query to position the rectangle(s).
The end result looks like this: 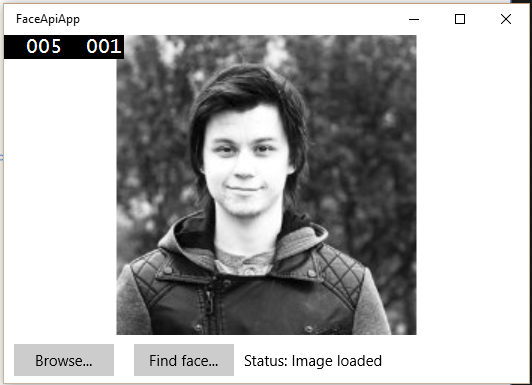

##Summary In this post we’ve looked into the basics of Face API from Microsoft Cognitive Services. We’ve seen how to get connected to the API by signing up. Further on we’ve talked about how our app will turn out in the end, and we started working with the Face API with a very basic example for marking a face in an image.
The next post in this series will move into training a person group and do facial verification. I’ll see you then!