
Official Raspberry Pi Display and Windows 10 IoT Core
Last year an official touch display for Raspberry Pi was released. Naturally that was something I had to get my hands on, and I did. The screen itself is 7″, has a screen resolution of 800 x 480 px and has 10 finger capacitive touch. For my use I immediately thought of using it as a controller for my home automation system, which is currently in the making.
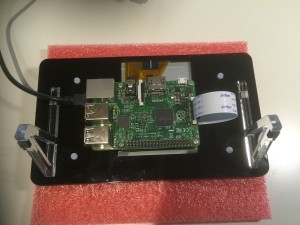
In this post I will walk you through how to mount the display properly and getting started with it. I know I had some issues when setting it up, probably mostly due to the fact that I haven’t explored how to mount ribbon cables on the Pi enough. The end result will look like this:
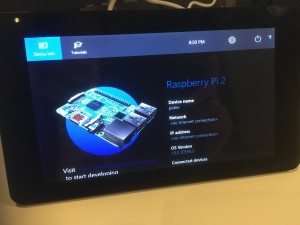
As you may note, I have Windows 10 IoT installed here. As of today this does not include support for touch functionality. I know there are some libraries out there, which gives this support, so I will explore this later, and report on this later. For now, if you need touch support I would suggest you get the latest version of Raspbian OS. Also you should know you need at least Windows 10 IoT version 10.0.10556, from the Windows Insider Preview. You can find information and downloads at Windows Dev Center.
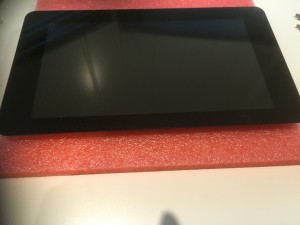
The display looks like this when it’s straight out of the box:

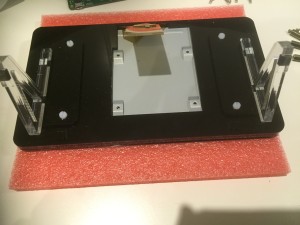
A nice feature that followed along was a stand for it. Mounting this was quite easy, you just add layer on layer, following the instructions given. The result should look like this:
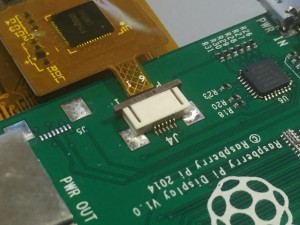
There was an adapter board included, naturally. This was the next thing to attach. Before placing it though, it is smart to connect the display ribbon cable to the back of the adapter board.
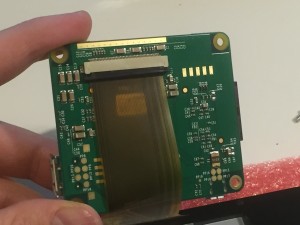
I struggled a bit here, since I didn’t realize that the black bar needed to be pulled out, and pushed back in when the cable was attached. Also I found that you really need to ensure that is properly attached, as the screen won’t display anything if it is loose.
When this is done, you can attach the adapter board to the back of the screen, and attach the smaller touch ribbon cable in the slot called J4.
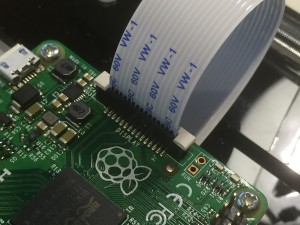
Next it is time to attach the DSI ribbon cable, which will be connected to the Pi, to the adapter board.
Moving on to the Pi itself. This should be placed with the pins facing upwards (I don’t actually think there is room the other way). Attach it so that you can attach the DSI ribbon cable to the port called “DISPLAY”. It should look like this:
When this is done it should be possible to power up the Pi and the display, and see something on the screen. There are a few ways to power both the Pi and the screen. You can either connect jumper wires from the Pi and to the display, and power the adapter board with a 2Amp power supply. Another option is to use the USB connection from the adapter board to power the Pi from that. That is what I’m currently doing.
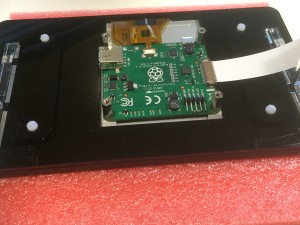
All in all the finished mount should look something like this (note: I have not attached power to the Pi in any ways here):
Once this is mounted you can power up, and you should be able to see something on the display. If not, you should check the ribbon cables. If you’re using Windows 10 IoT you will need to connect an external mouse/keyboard as well (at least until Microsoft adds support for touch, or you find a third-party library which does it). If you use Raspbian OS you will need to add some updates to be able to use the touch functionality. These are:
sudo apt-get update sudo apt-get upgrade
A few words on the quality and such. The display shows color ok, and the picture is crisp. If would off course be better with higher resolution, but I think it is ok, at least for the areas I will use it for. When it comes to the stand it is nice to have, but at the same time it kind of blocks some of the connections. The USB connection from the adapter board is a bit awkward, and the same goes for the USB and network connection to the Pi. It is very nice if you don’t need any of these though.
That’s it for now, I hope you’re able to follow along with the instructions, if needed. If you do have this display yourself, are you using it with Raspbian or Windows 10 IoT? Are you happy with it?