
Put a name to the face Microsoft Cognitive Services
This is the second post in a series of posts, where we’ll look into Microsoft Cognitive Services. More specifically we’re looking at the Face API, and what that can do for us in terms of identifying people. The end goal is to connect a web camera to a Raspberry Pi, grab an image of a person, identify that person and show the name on a screen.
In the first post we described some basic terms one should know and we looked at how you could get API keys for the Face API. We also looked into detecting faces in an image, where we marked a face with a square. If this is the first post you’re reading in this series, I highly suggest you read the first post, as we’ll continue building on the app we started on there.
All the source code used in this post can be found over at GitHub, and you are free to use it however you want.
Updating the app
In the previous post we created a simple UI for our app. It consisted of a canvas, two buttons and a status field. To extend the functionality we’re going to add a few elements to that app; Three buttons and a new text field. To achieve this, you’ll want to add two new rows to your grid, and add the following XAML for the new elements:
<Button x_Name="GeneratePersonGroupButton" Content="Generate group" Grid.Row="2" Grid.Column="0" Width="130" HorizontalAlignment="Center" Click="GeneratePersonGroupButton_Click" />
<Button x_Name="TrainGroupButton" Content="Train group" Grid.Row="2" Grid.Column="1" Width="100" HorizontalAlignment="Center" Click="TrainGroupButton_Click" />
<Button x_Name="IdentifyFace" Content="Identify" Click="IdentifyFace_Click" Grid.Row="2" Grid.Column="2" Width="100" HorizontalAlignment="Left" />

<TextBlock x_Name="NameField" Text="Unknown face..." Grid.Row="3" Grid.Column="0" Grid.ColumnSpan="3" VerticalAlignment="Center" />
The buttons describe what we’re going to do, to be able to identify a face. The first step is to generate a person group, and add persons to that group. Next we need to train the person group, so when we upload a photo for identification, the service can identify it. The last step is to run the identification process. The text field just describes the status of the step we’re currently at.
Create persons
One of the key components to be able to identify a person is to have a person group with persons in it. For this example, we’ll create one person group. To do this you’ll need a variable for the FaceServiceClient (as we created last time), and you’ll also need to define a string with the person group id. So to create the person group you’ll need to do the following:
private readonly IFaceServiceClient _faceServiceClient = new FaceServiceClient("API_KEY_HERE");
private const string _personGroupId = "family3";

await _faceServiceClient.CreatePersonGroupAsync(_personGroupId, "Family 3");
As you may see, the two first lines is at class level, while the last line is within the click handler for the “GeneratePersonGroupButton”.
== A quick note on the person group id. The id can consist of numbers, ‘-’, ‘_’ and lower case, English letters. ==
In the source code, you’ll notice I am doing some checking to check if the person group exist or not. This is simply since you can’t have two groups with the same person group id.
Moving on you’ll need to create the persons that should be in that group. This can be done like this:
var lady3 = await _faceServiceClient.CreatePersonAsync(_personGroupId, "Lily");
When a person has been created in a given person group, it is time to associate some images with that person. First off you need to get hold of the sample photos to use. They are present in the repository for this project, but if you’re following along with your own project, they can be found here. In this example we’ll just hardcode the path for the images needed, and the association between images and persons, but you’ll get the idea behind it from the following code:
string lady3ImageDir = @"./PersonGroup/Family3-Lady/";

foreach(var path in Directory.GetFiles(lady3ImageDir, "*.jpg"))
{
    using (Stream s = File.OpenRead(path))
    {
        await _faceServiceClient.AddPersonFaceAsync(_personGroupId, lady3.PersonId, s);
    }
}
When all the necessary persons have been added to a person group it is time to train the person group, which we’ll do next.
Train the person group
Training a person group is important to be able to perform an identification on that person group. This step is required if you add new persons, if you remove persons or edit the face of any persons registered. To train a person group you need to add one line of code. However, we’ll add some more code, so we’re able to determine if the training process is done or not. Add the following to the click event of the button named “TrainGroupButton”:
await _faceServiceClient.TrainPersonGroupAsync(_personGroupId);

TrainingStatus status = null;

while(true)
{
    status = await _faceServiceClient.GetPersonGroupTrainingStatusAsync(_personGroupId);

    if(status.Status.ToString() != "running")
    {
        NameField.Text = "Person group training complete";
        IdentifyFace.IsEnabled = true;
        break;
    }

    await Task.Delay(1000);
}
The training status field is actually an enum, which can be “Succeeded”, “Failed” or “Running”. In the API documentation it is marked as a string, so it is not yet updated. Obviously it would be better to report back the actual status, and deal with it if the training has failed, but we’re taking the quick way for now.
Identify a face
The last step is to write the code required to identify faces. The steps required to this is as follows: 1. Open an image and load it to a stream 2. Detect faces in image 3. From the faces detected generate an array with Face IDs 4. Use the generated array to identify persons 5. Map the results to a person in the person group
In our example we’ll go through these steps, and print the names of identified persons to the text field we added to the UI. Add the following code to the “IdentifyFace” button’s click handler:
using (Stream s = await _imageFile.OpenStreamForReadAsync())
{
var faces = await _faceServiceClient.DetectAsync(s);
var faceIds = faces.Select(face => face.FaceId).ToArray();
StringBuilder resultText = new StringBuilder();
var results = await _faceServiceClient.IdentifyAsync(_personGroupId, faceIds);
if (results.Length > 0)
resultText.Append($"{results.Length} face(s) detected! t");
foreach(var identityResult in results)
{
if (identityResult.Candidates.Length != 0)
{
var candidateId = identityResult.Candidates[0].PersonId;
var person = await _faceServiceClient.GetPersonAsync(_personGroupId, candidateId);
resultText.Append($"Detected: {person.Name}t");
}
}
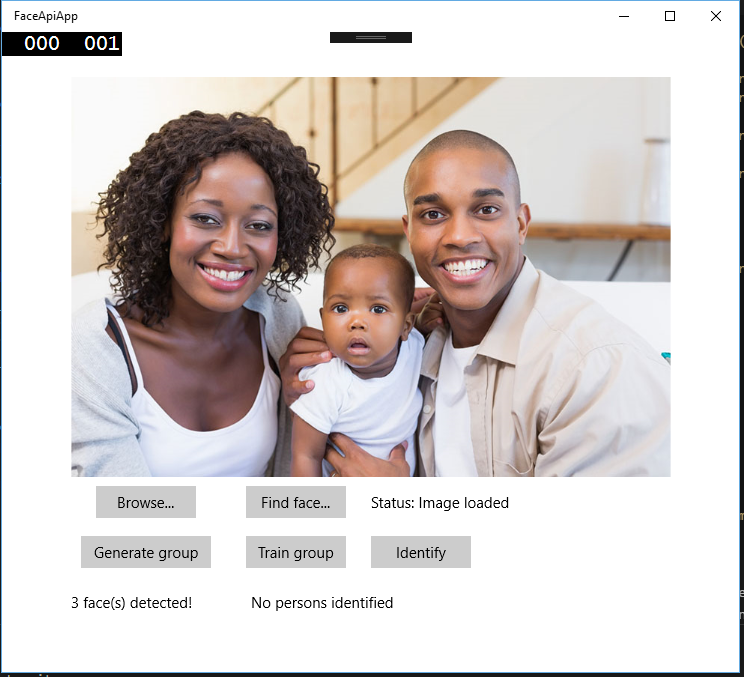
if (resultText.Length == 0)
resultText.Append("No persons identified");
NameField.Text = resultText.ToString();
}
What you see is that the results from our identification process can contain several hits, which basically is the faces from the image. These faces contain candidates of who they may be. The array with candidates is sorted by confidence of how certain the service is of the result. Assuming the first entry is the correct one, we use that to get a person, which contains the name and other information of that person. This is then shown in the text field below the buttons.
The final result of the app, so far, looks like this: 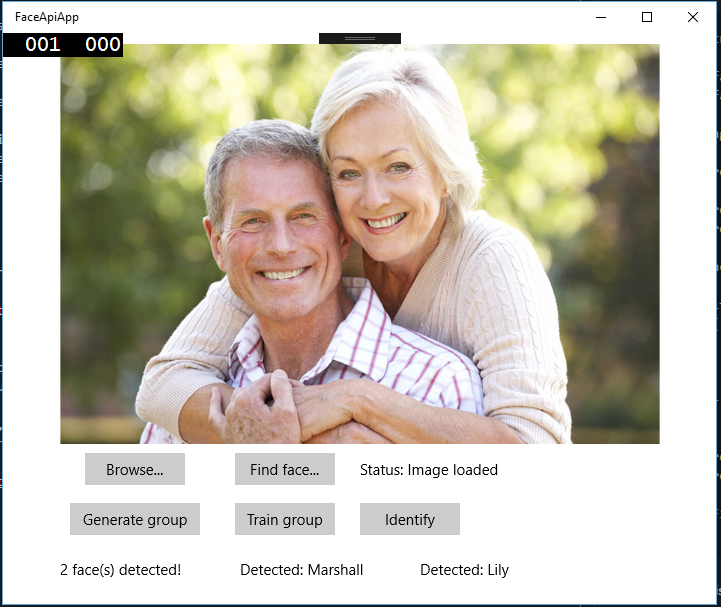
To improve this, you may want to add a square around each face, and a label for each face, stating their name. We won’t be doing that here, but I’ll leave that as a challenge for you to extend the app with!
Summary
In this post we have looked at what is needed to identify a person from an image. We updated the app from our previous post to have the required UI. We learned to create a person group and add persons to it, and we also saw how to associate images to each person. We looked into the process of training a person group, and finally we looked through the steps needed to identify a face in an image.
In the next post we will look into another API from Microsoft Cognitive Service to be able to detect people on a web cam, grab a snapshot and identify that person. I hope to see you around then as well!